

*❇️ ఫేషియల్ రికగ్నిషన్ యాప్ సూచనలు...👇👇*
ఇక్కడ క్లిక్ చేసి ఫేషియల్ రికగ్నిషన్ యాప్ DSE FRC యాప్ ను ప్లే స్టోర్ నుంచి నేరుగా డౌన్ లోడ్ చేసుకోండి
*🔰దిగువ ఆధారాలతో మొబైల్ యాప్లోకి లాగిన్ చేయండి.*
*🎯యూజర్ పేరు: స్కూల్ UDISE కోడ్*
*♦️పాస్వర్డ్: school@123*

🔖 *విద్యార్థి నమోదు చిహ్నంపై క్లిక్ చేయండి*
🔖 *క్లాస్ & సెక్షన్పై క్లిక్ చేయండి*
🔖 *విద్యార్థి పేరుపై క్లిక్ చేయండివిద్యార్థి ముఖం సర్కిల్లో ఉండేలా మొబైల్ కెమెరాను ఉంచండి*
🔖 *రిజిస్ట్రేషన్ని ప్రారంభించడానికి విద్యార్థిని నెమ్మదిగా కళ్ళు రెప్పవేయమని అడగాలిఆకుపచ్చ వృత్తం విద్యార్థి ముఖాన్ని పూర్తిగా తిప్పుతుంది*
🔖 *విద్యార్థి ముఖంపై ఉన్న ఆకుపచ్చ వృత్తం లోపల క్లిక్ చేయండి*


🔖 *సమర్పించు బటన్పై క్లిక్ చేయండి*
👉 *సమకాలీకరణ బటన్పై క్లిక్ చేయండివిద్యార్థుల నమోదు పూర్తయింది మరియు విద్యార్థుల జాబితాలో గ్రీన్ టిక్తో గుర్తించబడింది*
*తరగతిలోని విద్యార్థులందరికీ ఒకే ప్రక్రియ చేయాలి*
*Facial app Login into the mobile app with below credentials*
*Username: School UDISE Code*
*Password: school@123*
⚫ *Click on the Student Registration Icon*
⚫ *Click on the Class & Section*
⚫ *Click on the Student namePosition the mobile camera such that student face should be in the circle*
⚫ *Should ask the student to blink their eyes slowly to initiate the registration*
*A green circle will rotate the student face completely*
*⚫ Click inside the green circle on the student face*
⚫ *Click on the Submit button*
⚫ *Click on the sync buttonStudent registration is completed and marked with green tick in the student list*
⚫ *Same process should be done for all the students in the class*
DUPLICATE STUDENT:
In Student registration If user finds
student status with blue color
(Verification and approval is under
process) in mobile app
Below steps need to follow

User needs to click or past the link in web browser to enter into DSE-FRS Attendence System
page
User needs to enter User Name , Password and select the Department from drop down
menu.
After which they have to enter the Captcha and click on ‘LOGIN’ button.

User needs to scroll down the left menu to click on ‘Duplicates’ and select ‘Student’ to
display Duplicate Student list.
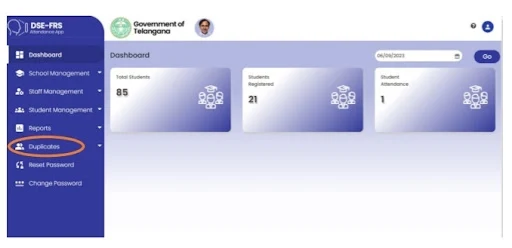
If the User is Same Person with a Different Name, then click on ‘Reject’.
User has to login into the mobile application by providing user id and password

User can see the landing screen as shown beside
User has to click on the Student Attendance icon from the landing screen as shown beside
App will display all the Classes to the user. User needs to select the Class
App will prompt the faculty to give permissions for camera and location as shown beside.


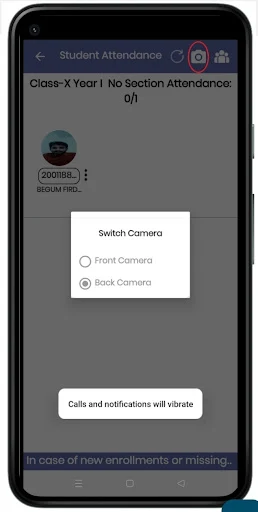
User can see the grid of the students with an icon at the top bottom to capture the attendance as shown in the screen

On click of Icon, application will prompt for
1:1(Portrait) and 1:N(Landscape)

User needs to select the 1:1 mode to capture the
attendance one by one
App will open the back camera with a circle as shown beside.
User needs to make sure the student’s face is completely within the circle and ask him/her to blink eyes


User can see the grid of the students with an icon at the top bottom to capture the attendance as shown in the screen
On click of icon, application will prompt for 1:1(Portrait) and 1:N(Landscape)
App has to select the 1:N mode to capture the
attendance of the students as a group
App will open the camera in landscape mode
to capture the attendance of the students as
a group either by bench by bench or by long
shot

with green names and shows the count of students got identified
Once all the students got identified, application
will select one or more students randomly for
liveliness check
User has to capture the attendance of the
identified student by asking him/her to blink their
eyes.
User will mark the student with green tick after
attendance got marked
User will prompt the faculty to sync the
attendance of the student to the server

Note:
Slowly blink your eyes. Keep face in the circle.
Ensure Proper light
Don't shake the phone while capture
Ensure only single person while capturing
Look straight to the camera to ensure
proper lighting
Remove mask / cap while capturing
చాలామంది ఉపాధ్యాయ మిత్రులు ఫేస్ రికగ్నైజేషన్ యాప్ లో ఫోటో తప్పుగా పడినట్లయితే, లేదా వేరే విద్యార్థి ఫోటో ఆడ్ అయినట్లయితే *డిలీట్ ఆప్షన్* కనిపించడం లేదు అని అడుగుతున్నారు*.
👉 అలాంటివారు మొదటగా యాప్ లాగిన్ చేయండి
👉మూడవ ట్యాబ్ డీటెయిల్ రిపోర్ట్ లోకి వెళ్ళండి.
👉అక్కడ కిందికి స్క్రోల్ చేసి చూసినట్లయితే బ్లూ కలర్ లో క్లాస్ నెంబర్స్ కనిపిస్తాయి.
👉క్లాస్ పై క్లిక్ చేసినట్లయితే ఆ తరగతిలోని విద్యార్థుల పేర్లు ఓపెన్ అవుతాయి.
👉అక్కడే మీకు view మరియు delete అనే రెండు బటన్స్ కనిపిస్తాయి.
👉డిలీట్ సెలెక్ట్ చేసినట్లయితే ఆ ఫోటో కంప్లీట్ గా డిలీట్ అవుతుంది.
👉ఆ తర్వాత మరల ఆ విద్యార్థికి ఫ్రెష్ రిజిస్ట్రేషన్ చేయాలి.


Please give your comments....!!!